Go is a very powerful language and has been making a lot of noise in the developer communities. Go is lean, powerful and efficient for enterprise-level large scale projects or small group applications.
Now, it is very significant for a programming language to have a framework that is stable and feature-rich to allow developers to take advantage of additional functionalities in a much easier way. Go has matured since its release and owns a wide range of amazing frameworks.
Today we are going to learn about the Revel Framework and try to build something basic with it.
Revel Framework
Revel’s official site it says that it is:
“ A high-productivity, flexible web framework for the Go language. „
Some of the key features of this framework are:
- Quick Start:
The installation for Revel is simple and quick. You just need to make sure that you have Go installed and that you know the GOPATH. You just have two commands to run and that will install Revel and the Revel Command-Line Tool.
- Comprehensive:
Revel provides routing, parameter parsing, validation, session/flash, templating, caching, job running, a testing framework, and even internationalization. It doesn’t require any third party libraries or middleware implementations in order to do complex tasks, it’s relatively self-contained.
- Stateless:
Revel provides primitives that keep the web tier stateless for predictable scaling.
- Reusable MVC Components:
Revel has modules. These are reusable MVC components that you can implement across all your projects. No need to copy and paste or rewrite your code with these.
- Engine Driven:
Revel has flexibility with your choice of custom Server, Session and Template engines. if you have a custom use scenario no more need to hack the code. All components are selectable inside the application configuration – your development and production environments work synchronously.
- Migration Friendly:
If you already have an application started you can still migrate easily to Revel by passing the path that you want your mux to handle to Revels Mux, and all requests for that path will be passed to that your Http muxer.
- Flow Control:
Revel is built around composable middleware called filters, which implement nearly all request-processing functionality. Developers have the freedom to replace the default filters with custom implementations.
- DEP Enabled:
Revel implements Go’s dependency management tool DEP. Making consistent builds a breeze.
- Hot Code Reload:
Edit, save, and refresh. Revel compiles your code and templates for you, automatically.
So, Let’s start with setting up a basic project with Revel. I am assuming that you have already installed Go, if you have not please follow the instructions from here.
Installing Revel
Open your terminal and navigate to your GOPATH.
If you have not setup your GOPATH, I would suggest you to do that first as that is the directory where your Go codes will stay. You will find the instructions for it from the above link when you has installed Go.
To get the framework run the following command:
$ go get github.com/revel/revel
The above command:
- Clones the repository to
$GOPATH/src/github.com/revel/revel/ - Finds all the dependencies and runs
go getfor them.
To get and build the Revel Command Line Tool:
$ go get github.com/revel/cmd/revel
Make sure $GOPATH/bin directory is in your PATH so that you can reference the command from anywhere.
Creating a new Revel Application
To create a new Revel Application, there is not much you have to do, just navigate to your GOPATH and run the following command:
$ revel new revelSampleApp

Running the Application
You can run your new application by just one command mentioned below:
$ revel run -a revelSampleApp
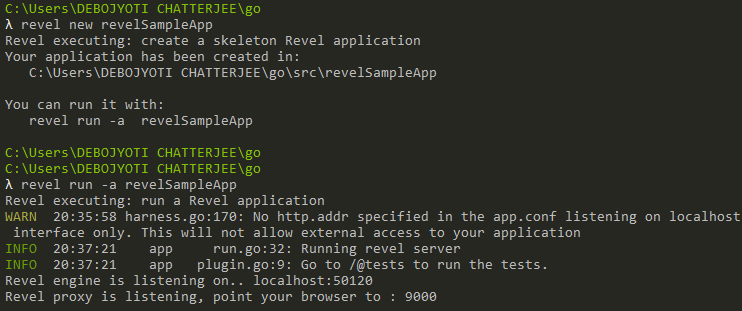
Open up a new tab on your browser and point to : http://localhost:9000/
Well done!! If you have followed all the instructions correctly you should be looking at something like this right now:

Now, we have setup the project successfully and it’s time to make something basic. Lets code to build an API that fetches the list and details of cars.
To achieve this, we need to create a Model, a Controller and configure the routes.
Creating Model
Revel does not have an integrated ORM tool yet, so you have to create the directory yourself.
Add a folder ‘models’ inside the ‘app’ directory of your project and create a new file ‘cars.go’
The path should be like app\models\cars.go
We need to add a struct with some basic properties that a car can have, add the following code in app\models\cars.go :
package models
type Car struct {
     ID      int
     Name    string
     Type    string
     Engine string
 }
Creating a Controller
Add a new controller in so that the relative path of the file is app\controllers\cars.go
Let’s create a Cars struct which will inherit the properties from revel.Controller struct, to do this add the following to the cars.go controller:
package controllers
import (
     "github.com/revel/revel"
 )
type Cars struct {
     *revel.Controller
 }
Now let’s create a function to display the list of cars:
package controllers import (
"revelSampleApp/app/models"
"github.com/revel/revel"
)
 type Cars struct {
     *revel.Controller
 }
 var cars = []models.Car{
     models.Car{1, "Bugatti Chiron", "Automatic", "8.0 L (488 cu in) Quad-Turbocharged W16"},
     models.Car{2, "Bentley Mulsanne", "Automatic", "Twin Turbocharged V8 Engine"},
     models.Car{3, "Audi A3 Cabriolet", "Automatic", "TFSI Petrol Engine"},
 }
 func (c Cars) List() revel.Result {
     return c.RenderJSON(cars)
 }
So in the above code we have created a member variable holding the array of cars, using the Car model that we have already created before. The function renders the data into a JSON format.
Now, let’s do a little more. Let’s make another function that will fetch individual car data based on the carID requested.
Append the following code in the same controller file:
func (c Cars) Show(carID int) revel.Result {
     var res models.Car
     for _, car := range cars {
         if car.ID == carID {
             res = car
         }
     }
     if res.ID == 0 {
         return c.NotFound("Could not find Car")
     }
     return c.RenderJSON(res)
 }
So, here we’ve used a simple for loop to iterate over the data and if a match is found we render that data in JSON format else a 404 is returned.
Set up Routing
Almost everything is set up now except setting up the routes for the incoming requests. Let’s do that quickly.
We need to configure the file conf\routes in your project folder and add the following:
GET     /                                       App.Index
GET     /cars                                  Cars.List
GET     /cars/:carID                           Cars.Show
This will map the /cars to the List() function and /cars/:carID to the Show(carID int) function.
Now restart Revel App using the command :
$ revel run -a revelSampleApp
You should see the default welcome page on http://localhost:9000/
Point the browser to: http://localhost:9000/cars and you should see the list of cars in JSON format.
Similarly you can also point to http://localhost:9000/cars/2 and you should see the details of the car with ID: 2.
So that’s it for this article, if you want to check the app you can visit my the repository and clone it. Make a pull request of you want to add changes to it, you are always welcome!