In our previous tutorial, we have explained how to install dependencies for a successful Postfix SMTP Mail server and basic configurations should be used for postfix. In continuation to the same, we will now explain the additional configuration required to complete the setup.
Step 4: Configure DKIM settings
In order to configure DKIM, we have to create DKIM verification keys and map it to DKIM process.
$ sudo mkdir -p /etc/opendkim/keys
$ cd /etc/opendkim/keys
$ sudo opendkim-genkey -b 2048 -h rsa-sha256 -r -s smtp -d example.com -v
Step 4.2: Setup trusted hosts
We have to prepare the list of trusted hosts, who should be allowed to send emails into following file: “/etc/opendkim/trusted.hosts“
$ sudo nano /etc/opendkim/trusted.hosts
127.0.0.1
::1
localhost
smtp
smtp.example.com
example.com
Step 4.3: Secure access to your DKIM directory
$ sudo chown -R opendkim:opendkim /etc/opendkim
$ sudo chmod go-row /etc/opendkim/keys
$ sudo chmod u=rw,go=r /etc/opendkim.conf
Step 4.4: Update main DKIM config
Now let’s update DKIM config to use your keys and trusted hosts. Please compare your system configuration with the following configuration and update accordingly.
sudo nano /etc/opendkim.conf
# This is a basic configuration that can easily be adapted to suit a standard
# installation. For more advanced options, see opendkim.conf(5) and/or
# /usr/share/doc/opendkim/examples/opendkim.conf.sample.

# Log to syslog
Syslog			yes
# Required to use local socket with MTAs that access the socket as a non-
# privileged user (e.g. Postfix)
UMask			007

# Sign for example.com with key in /etc/dkimkeys/dkim.key using
# selector 'smtp' (e.g. smtp._domainkey.example.com)
Domain			dochipo.com
KeyFile			/etc/opendkim/keys/smtp.private
Selector		smtp

# Hosts to ignore when verifying signatures
ExternalIgnoreList	/etc/opendkim/trusted.hosts
InternalHosts		/etc/opendkim/trusted.hosts

# Commonly-used options; the commented-out versions show the defaults.
Canonicalization	simple
Mode			sv
SubDomains		no
AutoRestart		yes
AutoRestartRate		10/1M

# Socket smtp://localhost
#
# ##  Socket socketspec
# ##
# ##  Names the socket where this filter should listen for milter connections
# ##  from the MTA.  Required.  Should be in one of these forms:
# ##
# ##  inet:port@address           to listen on a specific interface
# ##  inet:port                   to listen on all interfaces
# ##  local:/path/to/socket       to listen on a UNIX domain socket
#
Socket          inet:8892@localhost
# Socket          local:/var/run/opendkim/opendkim.sock

##  PidFile filename
###      default (none)
###
###  Name of the file where the filter should write its pid before beginning
###  normal operations.
#
PidFile               /var/run/opendkim/opendkim.pid


# Always oversign From (sign using actual From and a null From to prevent
# malicious signatures header fields (From and/or others) between the signer
# and the verifier.  From is oversigned by default in the Debian pacakge
# because it is often the identity key used by reputation systems and thus
# somewhat security sensitive.
OversignHeaders		From

##  ResolverConfiguration filename
##      default (none)
##
##  Specifies a configuration file to be passed to the Unbound library that
##  performs DNS queries applying the DNSSEC protocol.  See the Unbound
##  documentation at http://unbound.net for the expected content of this file.
##  The results of using this and the TrustAnchorFile setting at the same
##  time are undefined.
##  In Debian, /etc/unbound/unbound.conf is shipped as part of the Suggested
##  unbound package

# ResolverConfiguration     /etc/unbound/unbound.conf

##  TrustAnchorFile filename
##      default (none)
##
## Specifies a file from which trust anchor data should be read when doing
## DNS queries and applying the DNSSEC protocol.  See the Unbound documentation
## at http://unbound.net for the expected format of this file.

TrustAnchorFile       /usr/share/dns/root.key

##  Userid userid
###      default (none)
###
###  Change to user "userid" before starting normal operation?  May include
###  a group ID as well, separated from the userid by a colon.
#
UserID                opendkim
Step 4.5: Restart DKIM process
Now DKIM is ready for production use with the configuration related to your domain “example.com”. You need to restart as follows:
$ /etc/init.d/opendkim restart
Step 4.5: Setup Domain registrar TXT record
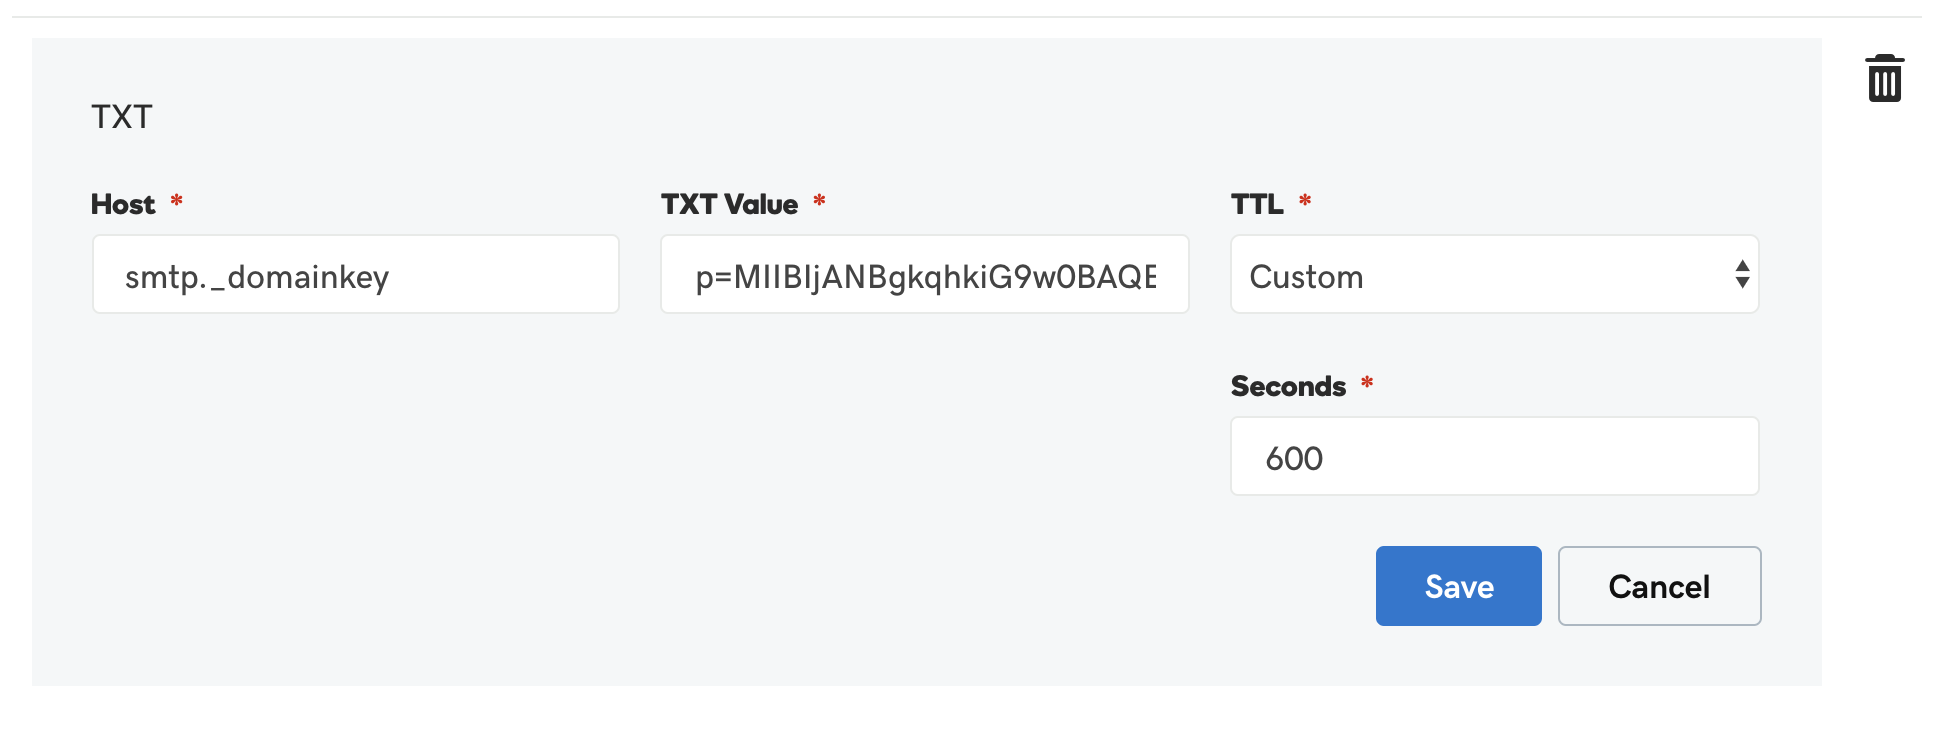
Once you are ready with the server side configuration, you have to update the DNS entries on your Domain registrar panel. You can check the required DNS record from the following file:
$ sudo cat /etc/opendkim/keys/smtp.txt
smtp._domainkey IN TXT ( "v=DKIM1; h=rsa-sha256; k=rsa; s=email; p=MIIBIjANBgkqhkiG9w0BAQEFAAOCAQ8AMIIBCgKCAQEAzYqzUreT6Hx8j6iodJFUCluajirzhlPjeAT/zvu6eWb2ybJAC18VMNV6wUfWXpCxkO0v6NkyCdGzIQDR0Z6ZNXkxfAOE1PMGAbObzuIMEQQK00BIF0H3bivifXkBhClX29SoN+K/UsWceoNGWLlbgv/EgbXgOi9b0STEIj27hwxhQmzA5ULj56mB/QwVnrqCPCgSr1cqC9y4iiRrG2Akr7To+BZLdjU7lHo+fmgkSqShCJ3lZlxGe2xBzalSDvf2V+o7I8hwsDeIkPm662DICwUuzG3dZ8Rn18X09NIaOySe2hS157sov+WLyJHVrYRFk1squOXkPIHtxJAZsaOyFQIDAQAB" )
You have to add DKIM TXT record from the above file to DNS panel (Godaddy). Screenshot as follows:
Step 4.6: Test Domain DKIM record
Once DNS record is updated, let’s test the validity of the record. If you have configured correctly then the following command should return a blank response.
$ opendkim-testkey -d example.com -s smtp
If something is wrong with the setup then you should get the following error message:
opendkim-testkey: ‘smtp._domainkey.dochipo.com’ record not found
Let’s assume all previous steps have been successfully executed, then we will have a running Postfix SMTP server for production use with no-spam policy checks. You need to restart the processes and run some tests.
$ sudo /etc/init.d/opendkim restart
$ sudo /etc/init.d/postfix restart
We will demonstrate to setup SPF, DMARC policy setup along with Email testing for your domain in our next tutorial as follows:
How to Install and Configure Postfix SMTP Mail Server on Ubuntu 18.04 LTS – Part 3 | SPF Setup